第四章 组件(Component)
组件的定义
组件(Components) 是OWL中UI的基本构建块,我们来看组件的基本定义代码:
class Component {
    constructor(props, env, node) {
        this.props = props;
        this.env = env;
        this.__owl__ = node;
    }
    setup() { }
    render(deep = false) {
        this.__owl__.render(deep === true);
    }
}

Component.template = "";
每个组件都是一个JavaScript类,它包含:
- 模板(Template):定义组件的HTML结构。
- 状态(State):组件的动态数据。
- 生命周期钩子(Lifecycle Hooks):控制组件的创建、更新和销毁时的行为。
- Props(属性):父组件传递给子组件的数据。
Odoo中所有的组件均是继承自OWL的Component。
组件的结构
一个 OWL组件通常由以下几个部分组成:
import { Component, useState } from "@odoo/owl";

class MyComponent extends Component {
    static template = "MyComponentTemplate";  // 组件的模板
    setup() {
        this.state = useState({ count: 0 }); // 组件的状态
    }
    increment() {
        this.state.count += 1;
    }
}
模板部分 在Odoo XML视图中定义组件的模板:
<t t-name="MyComponentTemplate">
    <div>
        <p>Count: <t t-esc="state.count"/></p>
        <button t-on-click="increment">Increase</button>
    </div>
</t>
t-esc="state.count" 用于绑定数据,t-on-click="increment" 绑定事件。
组件的核心概念
1. Props 属性
Props允许父组件向子组件传递数据:
class ChildComponent extends Component {
    static template = "ChildTemplate";
    static props = ["message"];
}
<t t-name="ChildTemplate">
    <p>Message: <t t-esc="props.message"/></p>
</t>
父组件使用子组件时:
<ChildComponent message="'Hello from Parent'"/>
2. State 状态管理
useState() 用于管理组件内部的动态数据:
setup() {
    this.state = useState({ count: 0 });
}
increment() {
    this.state.count += 1;
}
3. 生命周期钩子
组件提供了多个生命周期钩子:
| 生命周期方法 | 作用 |
|---|---|
| setup() | 组件初始化时调用 |
| willStart() | 组件渲染前调用(可用于获取数据) |
| mounted() | 组件插入 DOM 后调用 |
| willUpdateProps() | 组件接收新 Props 时调用 |
| willUnmount() | 组件销毁前调用 |
class MyComponent extends Component {
    async willStart() {
        this.data = await fetchData();
    }
    mounted() {
        console.log("Component is mounted!");
    }
}
4. 组件通信
父组件向子组件传递数据
<ChildComponent message="'Hello, Child'"/>
子组件向父组件发送事件
import { useComponent } from "@odoo/owl";
class ChildComponent extends Component {
   sendMessage() {
       this.env.bus.trigger("message", "Hello from child!");
   }
}
父组件监听:
import { useBus } from "@odoo/owl";
setup() {
   useBus(this.env.bus, "message", (message) => {
       console.log(message);  // "Hello from child!"
   });
}
自定义组件
如果我们想要自定义一个组件,那么可以按照下面方式进行:
class MyComponent extends Component {
    static template = "template_name";
    setup() {
        ...
    }
}

registry.category("view_widgets").add("my_component",{component: MyComponent})
WebClient
我们在经典的WebClient世界中已经对它非常熟悉了,但是从odoo开始使用OWL开始重构WebClient时,我们就注定了要以一种新的思维方式来认识它的新面孔。
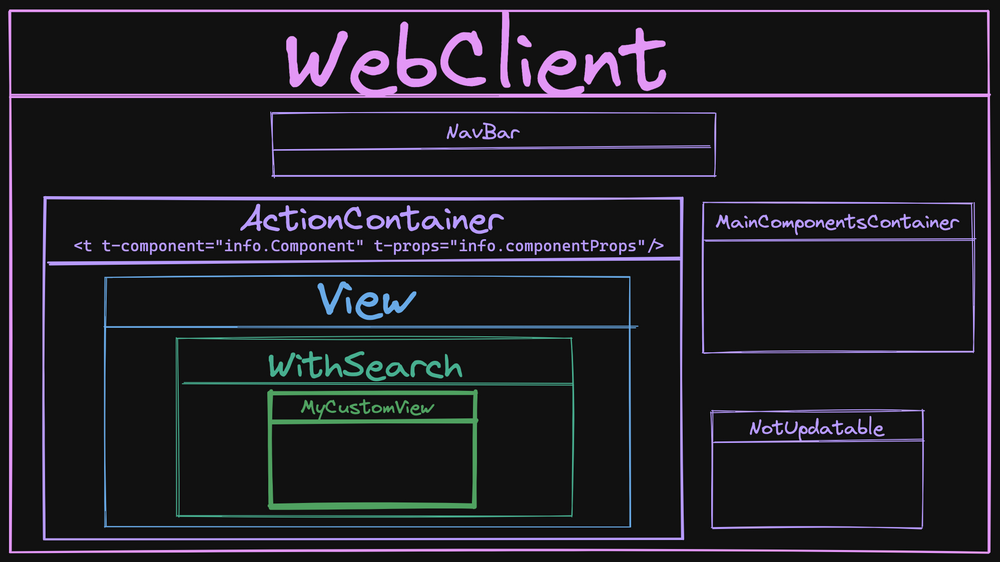
我们先来看一下WebClient的架构图:
加载
WebClient是加载到DOM的body标签的主要组件,它通过startWebClient方法实现加载的:
不同odoo版本的startWebClient实现会有差异 当前使用18.0版本为例
const app = await mountComponent(Webclient, document.body, { name: "Odoo Web Client" });
WebClient的定义
export class WebClient extends Component {
    static template = "web.WebClient";
    static props = {};
    static components = {
        ActionContainer,
        NavBar,
        MainComponentsContainer,
    };

    ...
}
由WebClient的组件定义可以看出,WebClient主要由以下三个部件组成:
- NavBar: Odoo顶端的导航栏
- ActionContainer: 动作容器
- MainComponentsContainer: 组件所在的容器
初始化
setup() {
    this.menuService = useService("menu");
    this.actionService = useService("action");
    this.title = useService("title");
    useOwnDebugContext({ categories: ["default"] });
    if (this.env.debug) {
        registry.category("systray").add(
            "web.debug_mode_menu",
            {
                Component: DebugMenu,
            },
            { sequence: 100 }
        );
    }
    this.localization = localization;
    this.state = useState({
        fullscreen: false,
    });
    useBus(routerBus, "ROUTE_CHANGE", this.loadRouterState);
    useBus(this.env.bus, "ACTION_MANAGER:UI-UPDATED", ({ detail: mode }) => {
        if (mode !== "new") {
            this.state.fullscreen = mode === "fullscreen";
        }
    });
    onMounted(() => {
        this.loadRouterState();
        // the chat window and dialog services listen to 'web_client_ready' event in
        // order to initialize themselves:
        this.env.bus.trigger("WEB_CLIENT_READY");
    });
    useExternalListener(window, "click", this.onGlobalClick, { capture: true });
    onWillStart(this.registerServiceWorker);
}
WebClient在初始化的过程中,内置了一下几种服务以供后续使用:
- menuService: 菜单服务
- actionService: 动作服务
- title: 标题服务
17.0及之前的版本时还有router服务和user服务的初始化操作,18.0取消了这些动作。
如果用户开启了开发这模式,那么WebClient将显示debug图标,并加载DebugMenu组件。
WebClient使用title服务设置了系统服务名称为"Odoo",并使用了关键字zopenerp。后面我们会介绍如果使用重载机制将系统标题更换为我们自定义的标题。
WebClient初始化的过程中还加载了若干总线,来完成事件响应。
挂载
WebClient挂载到DOM中之后就会触发WEB_CLIENT_READY事件,以通知其他组件开始工作。
Patch组件
在经典的WC实现中如果我们想要通过重载某个模块的的某个方法,可以使用include方法来实现, 到了OWL的世界中,也存在同样的方法, 即Patch方法. 下面我们就来看一下, 如何使用patch方法对一个组件进行重载.
首先patch方法位于web模块的utils包中,因此我们在我们的代码里中需要进行导入:
import { patch } from "@web/core/utils/patch";
patch方法接受三个参数:
- obj {object}: 需要被patch的对象
- patchValue {object}: patch的值
- pure {boolean}: 可选options的参数
14.0 15.0时patch方法接受4个参数,多出来的一个参数是patchName, 用来表示patch的名称。在后续的OWL版本中取消了这一参数。
这里我们以Mommy Base模块中, 设置系统标题的功能给大家展示如何patchWebClient对象. Mommy Base模块是笔者自己开发的一个模块, 主要用来对系统进行一些初始的个性化设置和增强功能. 这里我们要介绍的是它的设置系统标题功能, 我们都知道Odoo在安装完成后,默认显示的标题是odoo.
现在,我们想要把这个标题改掉,改成可以用户自定义的模式.通过对源码的分析,我们了解到,要想实现对系统标题的修改,就需要使用title服务的setParts方法, 想要获取到用户设置的标题,就需要使用rpc服务, 最后,我们在WebClient的初始化方法中对原有的标题进行修改.
patch(WebClient.prototype, {
    async setup() {
        this._super(...arguments);
        let data = await this.env.services.rpc("/web/dataset/call_kw/ir.config_parameter/get_param", {
            model: "ir.config_parameter",
            method: "get_param",
            args: ["mommy.title"],
            kwargs: {}
        })
        this.title.setParts({ zopenerp: data })
    }
});
odoo的系统标题使用了一个比较奇怪的关键字zopenerp, 原因也比较简单,就是为了方便查找..
super方法的使用
我们在前面的例子中可以看到,通常我们在patch一个方法时,通常想要访问他的父类方法,这里因为我们使用的是patch的对象而非原生ES6对象,因此我们不能使用super关键字,odoo为此专门指定了一个关键字_super来使用。
patch(object, "_super patch", {
  fn() {
    this._super(...arguments);
    // do other things
  },
});
通常情况下是可以像上述形式使用。但是也有例外的情况,就是如果我们patch的方法如果是一个异步方法,则不可以这么使用。原因是,this._super在patch之后被重新赋值了,因此在异步方法内部使用this._super它所对应的有可能不是你预想的那个方法。
解决方案是在异步调用前复制一个方法的调用。
patch(object, "async _super patch", {
  async myAsyncFn() {
    const _super = this._super.bind(this);
    await Promise.resolve();
    await _super(...arguments);
    // await this._super(...arguments); // this._super is undefined.
  },
});
父类的父类的调用
前面的例子中,我们对父类的方法调用可以这么处理,如果是对父类的父类,则需要使用调用类的prototype进行替换。
import BarcodeModel from '@stock_barcode/models/barcode_model';
import BarcodeQuantModel from '@stock_barcode/models/barcode_quant_model';
import { patch } from '@web/core/utils/patch';

patch(BarcodeQuantModel.prototype, "mengfu_stock.BarcodeModel", {
    async _createNewLine(params) {
        const _super = BarcodeModel.prototype._createNewLine.bind(this);
        await  Promise.resolve();
        ...
这个例子中 BarcodeQuantModel是BarcodeModel的子类,我们在重载BarcodeQuantModel的_createNewLine方法时,需要直接调用爷类BarcodeModel的_createNewLine方法而不是调用父类。
constructor方法
patch方法不能重载constructor方法,只能通过patch constructor方法中的方法而间接地达到目的。
class MyClass {
  constructor() {
    this.setup();
  }
  setup() {
    this.number = 1;
  }
}

patch(MyClass.prototype, {
  setup() {
    super.setup(...arguments);
    this.doubleNumber = this.number * 2;
  },
});